AMARHYS : Modeling and Texturing mountains
|
This tutorial requires some good knowledge of following 3DS Max tools/functions :
- Object modifier stack.
- Gizmo manipulations.
- Material editor.
|
|
Some important notes :
- To get same result as this tutorial, you have to use generic units (Customize/Units setup... and check [Generic Units]).
- Screenshots of this tutorial have been rendered using a "Catmull-Rom" Anti-Aliasing (AA).
- When a parameter value is not specified, keep default value.
- Do not forget to name all your materials and maps, even if not specified in tutorial.
|
MODELING MOUNTAINS :
 |
First, let us create mountains geometry : |
- Create a [Quad Patch] object (size 500 x 500) and set LengthSegs and WidthSegs parameters to 25. Name this object
"Mountain" (you must create it on Top view in order to get same axis reference as for this tutorial).
- Apply a [Displace] modifier and set Strength parameter to 100.
 |
Now, the map to displace geometry : |
- Select a free slot in material editor and choose a [Mix] map. Name it "Mountain Displace".
- In [Mix Amount], apply a [Gradient Ramp] map and set parameters as described below :
Cursor 1 (Pos=0, RGB=0,0,0)
Cursor 2 (Pos=34, RGB=75,75,75)
Cursor 3 (Pos=42, RGB=255,255,255)
Cursor 4 (Pos=73, RGB=255,255,255)
Cursor 5 (Pos=82, RGB=75,75,75)
Cursor 6 (Pos=100, RGB=0,0,0)
- In [Color#1], leave default values (black color, no map).
- In [Color#2], apply a [Noise] map (Type=fractal Size=75 High=0.7 Low=0.3 Levels=10 Color#1=0,0,0 Color#2=255,255,255).
- Copy this map as an instance in "Map" slot of [Displace] modifier.
 |
You should get something looking like that : |
TEXTURING MOUNTAINS :
|
Now, let us concentrate on mountains material : |
- Select a free slot in material editor and choose a [Top/Bottom] material (Blend=5 Position=90). Name it "Mountain Mat".
[Top Material] will be used for ground (name it "Ground") and [Bottom Material] for rock (name it "Rock").
Apply this material to "Mountain" object.
- Add a first [UVW Map] modifier to "Mountain" object (Type=Planar Alignment=Z MapChannel=1).
Press [Bitmap Fit] button and select "ground.jpg" bitmap. Downsize gizmo scale to 5% of its original size.
- Add a second [UVW Map] modifier to "Mountain" object (Type=Planar Alignment=Z MapChannel=2).
Press [Bitmap Fit] button and select "grass.jpg" bitmap. Downsize gizmo scale to 5% of its original size.
|
Come back to material editor : |
- Apply a [Mix] map in "Diffuse" slot of [Top Material]. Map 1 will be used for sand, map 2 for grass and stones.
- Apply a [Noise] map in [Mix Amount] (Type=Turbulence Size=50 High=0.35 Low=0.1 Levels=10 Color#1=0,0,0 Color#2=255,255,255).
- Apply a [Noise] map for sand in [Color#1] (Type=Fractal Size=0.3 High=0.65 Low=0.35 Levels=10 Color#1=220,195,170 Color#2=170,150,130).
- Apply a [Mix] map in [Color#2]. Map 1 will be used for stones, map 2 for grass.
- Apply a [Noise] map in [Mix Amount] (Type=Turbulence Size=2 High=0.4 Low=0.1 Levels=10 Color#1=0,0,0 Color#2=255,255,255).
- Apply a [Bitmap] map in [Color#1] for stones (Bitmap=ground.jpg Blur=0.3 MapChannel=1).
- Apply a [Bitmap] map in [Color#2] for grass (Bitmap=grass.jpg Blur=0.3 MapChannel=2).
As grass is really too much green, apply a [RGB Tint] filter to grass map (R=255,0,0 G=0,200,0 B=0,0,210).
- Copy "Diffuse" slot as instance into "Bump". Set bump amount to 20.
|
Now, if you render the scene, you should get this : |
Notice than ground texture appears on top of mountains. We will fix that later. Now, let's work on rock material.
|
Unlike ground material, rock material mapping is much complicated. Indeed, mountains geometry is too complex to use a single [UVW Map]
modifier. We could use some procedural maps which do not require any mapping coordinates but results are often non-realistic. Finally,
we will use a bitmap rock.jpg, two [UVW Map] modifiers
and a [Falloff] map. |
- Add a third [UVW Map] modifier to "Mountain" object (Type=Planar Alignment=Y MapChannel=3).
Press [Bitmap Fit] button and select "rock.jpg" bitmap. Downsize gizmo scale to 25% of its original size.
It should have approximately the same height as mountains.
- Copy the [UVW Map] modifier we have just created and paste it on top of modifier stack. Update parameters MapChannel=4.
Rotate gizmo 90° along its local Z axis.
|
Come back to material editor : |
- Apply a [Falloff] map in "Diffuse" slot of [Bottom Material].
- Apply a [Bitmap] map in top slot (Bitmap=rock.jpg Blur=0.3 MapChannel=4) and name it "Bitmap X".
- Apply a [Bitmap] map in bottom slot (Bitmap=rock.jpg Blur=0.3 MapChannel=3) and name it "Bitmap Y".
- Set others parameters as described below :
How to interpret this map : all faces of "Mountain" object whose normal is parallel to mountains local X axis will be
mapped with "Bitmap X" texture and all faces whose normal is perpendicular to mountains local X axis will be mapped with "Bitmap Y"
texture. All "intermediate" faces will receive a mix between "Bitmap X" and "Bitmap Y" depending on [Falloff] mix curve.
- Copy "Diffuse" slot as instance into "Bump". Set bump amount to 20.
|
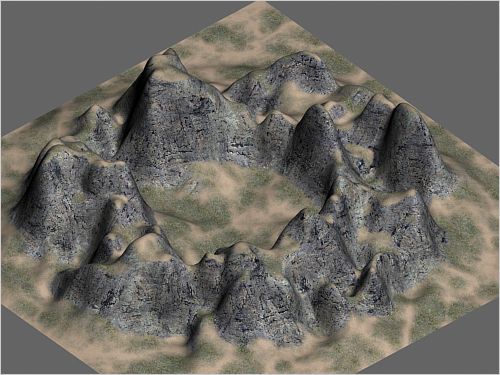
If you render the scene, you should get this : |
|
Now, let us try to improve rock material removing bitmap repeat effects. To do that, we need
two [UVW Map] modifiers and several [Mix] maps. |
- Copy the third [UVW] modifier and paste it on top of modifier stack. Update parameter MapChannel=5.
Rotate gizmo 90° along its local Z axis.
- Copy the fourth [UVW] modifier and paste it on top of modifier stack. Update parameter MapChannel=6.
Rotate gizmo 90° along its local Z axis.
|
Come back to [Falloff] map used for rock : |
- Apply a [Mix] map in top slot. Keep old map "Bitmap X" as a sub-map.
- Copy "Bitmap X" map from [Color#1] to [Color#2] (a copy, not an instance). Name it
"Bitmap X 90" and update parameter MapChannel=6.
- Apply a [Noise] map in [Mix Amount] (Type=Fractal Size=50 High=0.6 Low=0.4 Levels=10 Color#1=0,0,0 Color#2=255,255,255).
- Apply a [Mix] map in bottom slot. Keep old map "Bitmap Y" as a sub-map.
- Copy "Bitmap Y" map from [Color#1] to [Color#2] (a copy, not an instance). Name it
"Bitmap Y 90" and update parameter MapChannel=5.
- Apply a [Noise] map in [Mix Amount] (Type=Fractal Size=50 High=0.6 Low=0.4 Levels=10 Phase=10 Color#1=0,0,0 Color#2=255,255,255).
|
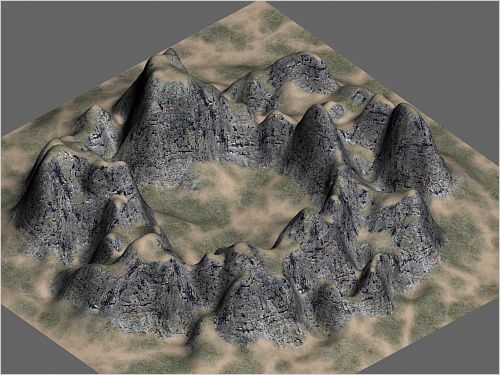
If you render the scene again, you should get this : |
|
Last step : update the material so that ground texture does not appear on top of mountains. |
- Add a seventh [UVW Map] modifier to "Mountain" object (Type=Planar Alignment=Y MapChannel=7).
Press [Fit] button and increase gizmo height (gizmo Y scale) so that its final size is a little bit
larger than mountains (should oversize both on top and bottom).
|
Come back to top of "Mountain" material : |
- Apply a [Blend] material in [Top Material] and keep old material as a sub-material.
- Apply a [Bitmap] map in "Diffuse" slot of material 2 (Bitmap=rock.jpg Blur=0.3 MapChannel=1).
- Copy "Diffuse" slot as instance into "Bump". Set bump amount to 20.
- Apply a [Gradient Ramp] map in [Mask] (MapChannel=7, AngleW=-90) and set others parameters as described below :
Cursor 1 (Pos=0, RGB=0,0,0)
Cursor 2 (Pos=30, RGB=0,0,0)
Cursor 3 (Pos=40, RGB=255,255,255)
Cursor 4 (Pos=100, RGB=255,255,255)
|
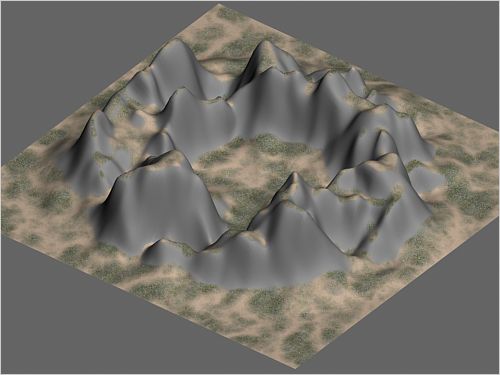
Final map tree : |
|
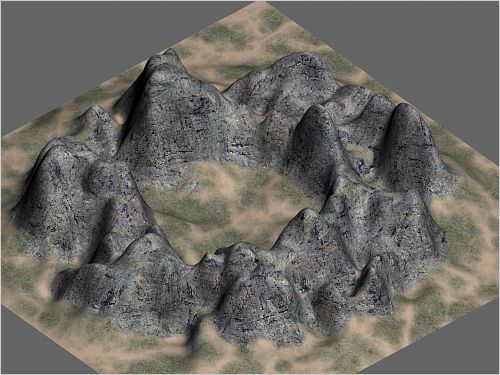
And final rendering : |
(c)Amarhys - Copyright 2003 Xavier CROUZY webmaster@amarhys.com
)
)
)